I've looked around online and wasn't able to find a visual ICord cast on tutorial, so I thought I would give it a go and create one myself, so here I go....
You can click on each photo for enlargement.

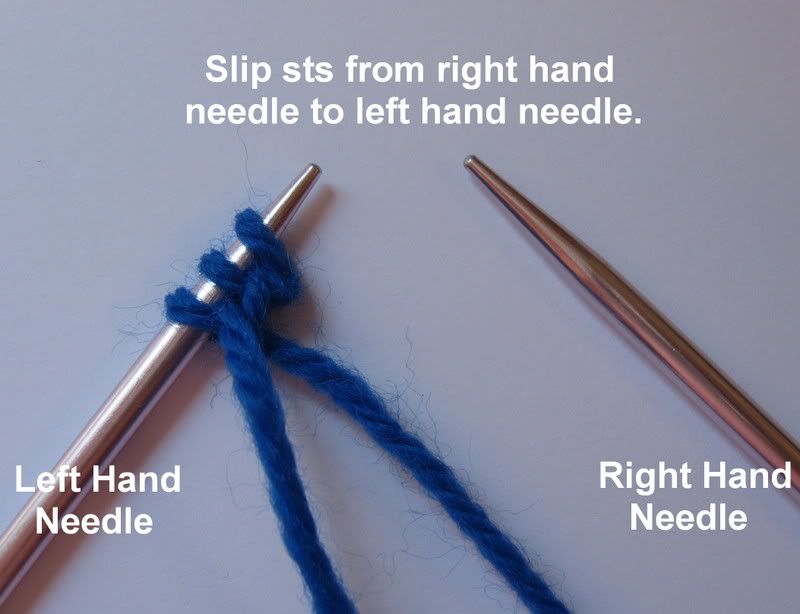
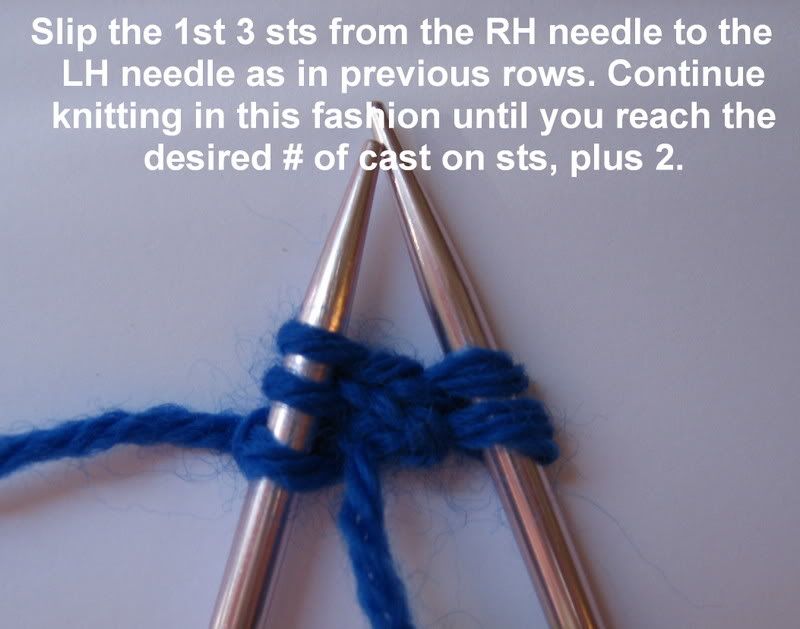
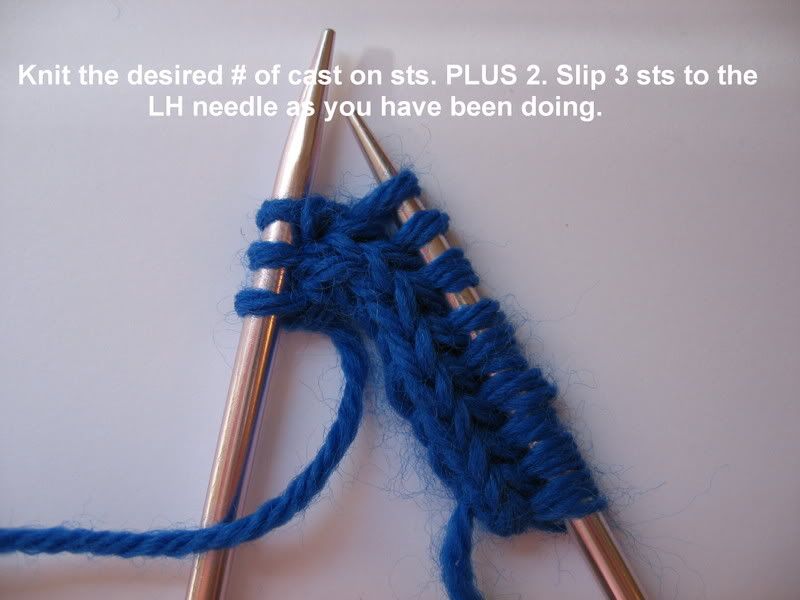
Slip these 3 sts from your right hand needle onto your left hand needle, this will position the working yarn behind the last st. on the LH needle readying it for icord.


Tutorial can be found in pdf form here.
47 comments:
Your tutorial is very good...I picked up on this cast on in 1 go!
I am very elated...I can continue with the pattern I'm learning...
And you were the first site I stopped at...GREAT JOB!!!!
Great tutorial! Thanks for sharing!
Several months ago, I was searching (in vain) for a tutorial on how to do an I-Cord cast-on. Thank you so, so much for providing this (and in pdf form too!)!!!
Brilliant! This is so much better than knitting an i-cord and then picking up stitches.
Thankyou for such a clear explanation! This is going to happen on the next hat I make :)
Thanks, ya'll!
You have really made me feel good about doing this tutorial.
I want to do some others, I just have to decide exactly what it will be and if I can do it well enough to have photos taken of me doing it, LOL!!
Thank ya'll SO MUCH for your support, it means much more than I can explain.
Happy Knitting & God Bless,
Becka (aka Rebecca)
never done this before-thanks for the tutorial! I'll be starting your touch of whimsy scarf for my Mom for Christmas now. :muah:yes I'll email you a pic when it's done.
Thank you so much for this! You explained it so well that even I could understand it, lol. Thanks!
I'm knitting your "Touch of Whimsey Scarf" for my daughter for Christmas. I've never done an Icord cast on an I wanted to let you know that your instructions are great! really easy to understand.
Thank you!
p.s. my maiden name is Mercier :)
I wish I had come across your site sooner! I'm making a pillow (my own design) with an I-cord border. This would have saved me from making an I-cord a million miles long to sew around the whole pillow. Oh well. Live and learn! A couple questions, though: I noticed that the stitches in the cast-on row were quite large, bigger than my regular knitting and I don't know how to fix it. Also, when the stitches are on the RH needle after CO, is that the right side? When I switched the RH needle to the left to knit, I noticed the other side looked different. I thought maybe I'd purl a row to make that the wrong side before I started knitting. Help!
Thanks for this effective tutorial. it's perfect for the Kippah KAL I'm trying to get off the ground.
Thanks for all of your kind words everyone!
Sylvie, I have your photos, they are great! Another Mercier..how cool is that?! There aren't very many of us around here! I will add them to the galleries as soon as PayPal & Photobucket fix my Pro account, terribly sorry for the delays!
Cables...sorry I didn't see your comment sooner, I've been sick & then out of town. I'm assuming you have figured it out! In my designs I use the ICord cast on as the right side, but, as with all knitting & design in general...experiment! I think it looks great either way, the right side or what we call the "wrong side"....play with design and use it the way you you like it! As for the cast on, if it's bigger than you desire, I would suggest using a smaller needle for the cast on sts until you reach the size that you like.
Please, if you have any further questions, please feel free to email me @ whimsicalknitting@comcastdotnet and I will get back to you much sooner!
Again, thank you all and may you all have a very happy and blessed 2008 and many years to follow!
God Bless,
Becka!
Thanks so much for this, I needed it for the Touch of Whimsy Scarf. You explained it so I got it on my 2nd try. :oD
What a great job you did. Your site was the first one I went to. Probably the only site. You made everything very clear. Thank you so much.
I actually used a make 1 instead of the kfb you used, and it makes a much neater edge. I could never figure out how to make a kfb look nice, though, so make 1 is my increase of choice. I hate any semblance of a purl in my knit rows. :op
what an excellent tutorial!
Thank you very much!
Thank you very much for this excellent tutorial! Not only are the pictures well done, but the text itself is written so clearly, I was able to print out just the text (to save on ink) and follow it without problem! :D
Thanks so much for your kind comments, friends!!
Thanks so much for your kind comments, friends!!
Excellent tutorial... BRAVO!!!
This was a great tutorial thank you so much. I was trying to do it from my pattern and I didn't understand it at all. Went to google and your tutorial came up and I am good to go now. Thanks again.
Thanks for the detailed visuals, I had been struggling with written instructions and then spent an hour looking through my library of knitting books. Finally, it dawned on me... do what the kids do! So I googled it, so glad I did.
Thanks, everyone! I'm so happy that you are enjoying the tutorial!
God Bless
becka
Fantastic tutorial!!! I'm looking to do the fiddlehead mittens on ravelry and an I-cord cast on was the one thing I couldn't do. Thanks for your tutorial awesomeness!!
Thank you for your time and energy in explaining this technique in an excellent understandable way! Much appreciated. Aloha from the Big Island. IsadoraD
Thank you so much for the great tutorial! I'm doing a test knit that calls for an i-cord cast on, and I've never done one before. I just finished!
Thanks for this tutorial. I did this cast-on once in my knitting class, but needed a reminder. This was a great help and very clear. Thanks for creating it and sharing it with us.
Ah, so that's how it's done! Great tutorial, thanks for posting it!
Thanks a million B! Great job explaining it!
Thanks...an excellent explanation.
THANKS!!!
Hi, when you slip the 3 stitches from the RH needle to the LH needle, do you slip it purlwise or knitwise? For one step it doesn't specify so I did it purlwise, but for the next step, it specified "knitwise," so I'm a little confused. Thanks for your help!
Thanks everyone!
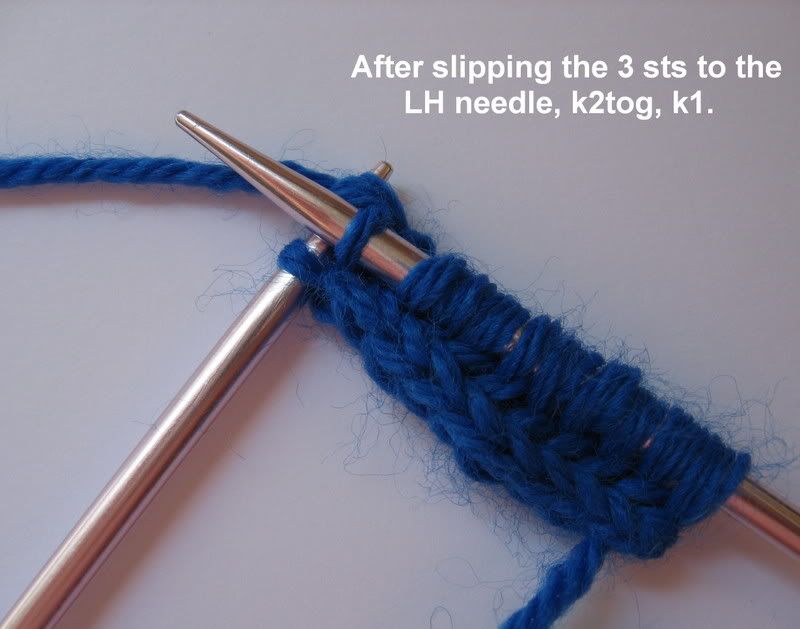
Sorry for the confusion, Tina, I slip the sts knitwise from RH to LH needle so that the sts sit properly on the LH needle.
God Bless!
Thanks for this excellent explanation on the i-cord cast on. What a great way to start a top down sweater. Anne
Hi,
your tutorial is better than any video.
thanks a lot from france!
flokol
Thanks, again, for your kind comments! So very, very happy that the tutorial is helpful!
God Bless
becka
I just found your web site and the first thing I noticed is the verse from Psalms and that your blog will serve the Lord. Needless to say, this is one site I will continue to visit.
Thank you! This is just exactly what I needed! :D have now cast on happily
Thank you, thank you, thank you! You are truly gifted with the rare ability to explain something so clearly and concisely. I had all but given up hope of figuring this out and your demonstration was spot-on. Thank you so much for this - I expect my sweater may eventually come to fruition.
Thank you!!!!!!
Thank you very much for this great tutorial !!
Nice post!! thanks for sharing!!
Yay! Now I can start my daughter's jumper!
Thanks for sharing! These instructions couldn't be easier!
Great tutorial! Like you said, there's not much out there on this technique. One question, can I just start knitting in the round on dpns? Is there a trick to it? I had to rip out the beginnings of a sweater sleeve 4 times! thanks
WONDERFUL! I desperately needed this a month ago -- but now I've finally found one that looks doable and good quality result. Thanks!
off white
supreme t shirt
golden goose
golden goose sale
kyrie 5 shoes
bape hoodie
hermes handbags
yeezy boost 500
birkin bag
off white nike
jordan
air jordan travis scott
ggdb outlet
golden goose outlet
a bathing ape
kyrie spongebob
fear of god
palm angels
Post a Comment